-
Guest, The MLPTP's Fundraiser and Prize Giveaway will be returning on June 1st! Check out this thread for all the latest news!
You are using an out of date browser. It may not display this or other websites correctly.
You should upgrade or use an alternative browser.
You should upgrade or use an alternative browser.
Breath of the Wild - G3 Custom!
- Thread starter SudsyPony
- Start date
- Joined
- Oct 30, 2022
- Messages
- 168
So smooth and clean : O!! And love the ponytail
- Joined
- Sep 9, 2022
- Messages
- 2,461
Did you airbrush this bad boy? Looks so neat!
- Joined
- Nov 12, 2022
- Messages
- 75
Thanks! I debated the hair style but really wanted to get that ponytail in there to make it look more like Link. I was pretty happy with it in the endSo smooth and clean : O!! And love the ponytail
Nope! I don't own an airbursh. He is hand painted with watered-down acrylics. Took about six layers or so to get that smooth blue over the body but it was really satisfying hahaDid you airbrush this bad boy? Looks so neat!
- Joined
- Sep 7, 2005
- Messages
- 1,843
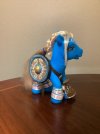
So goooooodFinally finished my Breath of the Wild custom! Really proud of this one! The belts are functional and the shield (which is made from real wood) can be removed.
View attachment 62361View attachment 62362View attachment 62363View attachment 62364
- Joined
- Sep 9, 2022
- Messages
- 2,461
Ok. Bravo! Nice and evenThanks! I debated the hair style but really wanted to get that ponytail in there to make it look more like Link. I was pretty happy with it in the end
Nope! I don't own an airbursh. He is hand painted with watered-down acrylics. Took about six layers or so to get that smooth blue over the body but it was really satisfying haha
- Joined
- Jun 25, 2014
- Messages
- 10,945
He looks great
- Joined
- Nov 12, 2022
- Messages
- 75
I wanted to walk through my process for this one in case anyone might be curious or if if is helpful to anyone else doing their own customs...
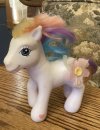
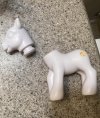
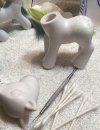
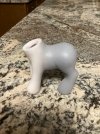
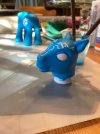
I started with a bait Daffidazey, mostly because that is what I had on hand when I started this project. But Daffidazey has a 3D cutie mark that left a hole behind after I removed it. To fix this, I filled the hole with milliput and sanded it to give it the exact shape I wanted without any lumps. The final step was to spray the leg with a coat of sealant to make it completely smooth instead of grainy.
I knew I wanted the pony to be blue like Link’s tunic in the game, but I didn't have a blue pony, so the next step was painting! I knew from experience with my other ponies that it is easier to get a nice pop of color on a white surface than a dark one, so I wanted to try to keep the markings and cutie mark white. I had an idea to use masking fluid, so I wouldn't have to try to paint around tiny symbols while doing the blue wash.
And y’all. It totally worked. I used Pebeo Drawing Gum and covered any areas I did not want blue (including the eyes). Then, I painted the body using watered down acrylics and a large brush. It took about six layers to get the smooth blue finish I was looking for. Afterward, I removed the gum (gently, with a mechanical pencil eraser), and the area underneath was still clean white!
I then cleaned up the edges and painted the details (which is always really hard for me to do because my hands are VERY shaky and I don't have good brushes for doing miniature work, but I digress). Afterward, I sprayed the entire pony with Mr. Super Clear to protect the paint as much as possible.
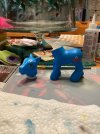
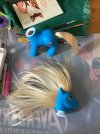
Then came the fun part! Rehairing. I made a few mistakes here. First, I just didn't have the color I wanted. The hair I had bought looked darker on the website and was a lot lighter than I wanted it to be. I couldn't afford to buy more though, so I just went with it. Second, I kept putting pressure on the pony’s chin when I was pushing the needle into the head, and I didn't realize I was doing that until after I had already scraped the paint off. Third, when I had finished the rehair and was trying to get the head back on the body, I gripped by the legs and scraped paint off of them too. Luckily, these were all small spots that were easy to repaint.
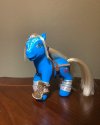
I styled the hair by French braiding it down the neck and ending with a pony tail. I added some holes to to the top of his head to make the hair thicker and pulled some out for Link’s iconic sideburns. I practiced a few different hairstyles on a bait pony before deciding on this one.
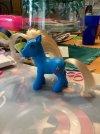
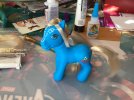
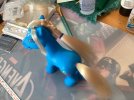
Next came accessories! Because who is Link without those? The leg wraps are made from white ribbon and hand painted. The arm guard is cut from some scraps of leather and also hand painted. In Breath of the Wild, the arm guard is on the other side, but OG Link is left-handed (he became right handed with the introduction of motion controls with the Wii, since most players would be right-handed), so my Link pony gets to be a lefty.
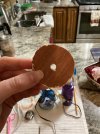
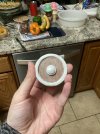
I ordered the belt buckle and small leather straps from a seller on Etsy to make the belts. I wanted them to be removable so I would be able to get the shield off and reposition it. The shield is made of real wood. It is the scrap of wood left over after you remove a hole in a door for a doorknob. I added the details with milliput and painted with acrylics. It has leather straps on the back that attach to the belts.
And there you have it!
I started with a bait Daffidazey, mostly because that is what I had on hand when I started this project. But Daffidazey has a 3D cutie mark that left a hole behind after I removed it. To fix this, I filled the hole with milliput and sanded it to give it the exact shape I wanted without any lumps. The final step was to spray the leg with a coat of sealant to make it completely smooth instead of grainy.


I knew I wanted the pony to be blue like Link’s tunic in the game, but I didn't have a blue pony, so the next step was painting! I knew from experience with my other ponies that it is easier to get a nice pop of color on a white surface than a dark one, so I wanted to try to keep the markings and cutie mark white. I had an idea to use masking fluid, so I wouldn't have to try to paint around tiny symbols while doing the blue wash.
And y’all. It totally worked. I used Pebeo Drawing Gum and covered any areas I did not want blue (including the eyes). Then, I painted the body using watered down acrylics and a large brush. It took about six layers to get the smooth blue finish I was looking for. Afterward, I removed the gum (gently, with a mechanical pencil eraser), and the area underneath was still clean white!
I then cleaned up the edges and painted the details (which is always really hard for me to do because my hands are VERY shaky and I don't have good brushes for doing miniature work, but I digress). Afterward, I sprayed the entire pony with Mr. Super Clear to protect the paint as much as possible.


Then came the fun part! Rehairing. I made a few mistakes here. First, I just didn't have the color I wanted. The hair I had bought looked darker on the website and was a lot lighter than I wanted it to be. I couldn't afford to buy more though, so I just went with it. Second, I kept putting pressure on the pony’s chin when I was pushing the needle into the head, and I didn't realize I was doing that until after I had already scraped the paint off. Third, when I had finished the rehair and was trying to get the head back on the body, I gripped by the legs and scraped paint off of them too. Luckily, these were all small spots that were easy to repaint.
I styled the hair by French braiding it down the neck and ending with a pony tail. I added some holes to to the top of his head to make the hair thicker and pulled some out for Link’s iconic sideburns. I practiced a few different hairstyles on a bait pony before deciding on this one.


Next came accessories! Because who is Link without those? The leg wraps are made from white ribbon and hand painted. The arm guard is cut from some scraps of leather and also hand painted. In Breath of the Wild, the arm guard is on the other side, but OG Link is left-handed (he became right handed with the introduction of motion controls with the Wii, since most players would be right-handed), so my Link pony gets to be a lefty.
I ordered the belt buckle and small leather straps from a seller on Etsy to make the belts. I wanted them to be removable so I would be able to get the shield off and reposition it. The shield is made of real wood. It is the scrap of wood left over after you remove a hole in a door for a doorknob. I added the details with milliput and painted with acrylics. It has leather straps on the back that attach to the belts.


And there you have it!


Last edited:
- Joined
- Sep 12, 2022
- Messages
- 1,110
You did such a great job on him! I still really like the use of that shirt motif on his face! The accessories are great! So nice! I think he still works well even with the lighter hair.
Thanks for sharing your process! I love reading build write-ups. I wasn't familiar with Miliput before, sounds like something I'd like to try! I've used two-part epoxy clay with great results in the past, but the tubs I got many years ago seem to have separated and I'm not sure if I have to discard them. Is Miliput hard to mix? My clay really took a lot of elbow grease to mix up but it was super strong when cured.
Thanks for sharing your process! I love reading build write-ups. I wasn't familiar with Miliput before, sounds like something I'd like to try! I've used two-part epoxy clay with great results in the past, but the tubs I got many years ago seem to have separated and I'm not sure if I have to discard them. Is Miliput hard to mix? My clay really took a lot of elbow grease to mix up but it was super strong when cured.
- Joined
- Nov 12, 2022
- Messages
- 75
You're welcome! Thanks for taking the time to read it lol. I believe milliput is just a brand of two-part epoxy clay. But it is meant specifically for crafts. I find it is very easy to mix. It's squishy like playdough, and I just knead it for the 7 minutes the box says to do. I also only use very small amounts though. I don't know how it would be if you were trying to use a lot. But it dries really strong, and I find the feel of it to be indistinguishable from pony body (unless you deliberately tried to bend it or something).You did such a great job on him! I still really like the use of that shirt motif on his face! The accessories are great! So nice! I think he still works well even with the lighter hair.
Thanks for sharing your process! I love reading build write-ups. I wasn't familiar with Miliput before, sounds like something I'd like to try! I've used two-part epoxy clay with great results in the past, but the tubs I got many years ago seem to have separated and I'm not sure if I have to discard them. Is Miliput hard to mix? My clay really took a lot of elbow grease to mix up but it was super strong when cured.
- Joined
- Sep 12, 2022
- Messages
- 1,110
Cool!! Do you know how long it stays workable? Can you smooth it with water? (I could with my old epoxy clay)You're welcome! Thanks for taking the time to read it lol. I believe milliput is just a brand of two-part epoxy clay. But it is meant specifically for crafts. I find it is very easy to mix. It's squishy like playdough, and I just knead it for the 7 minutes the box says to do. I also only use very small amounts though. I don't know how it would be if you were trying to use a lot. But it dries really strong, and I find the feel of it to be indistinguishable from pony body (unless you deliberately tried to bend it or something).
- Joined
- Nov 12, 2022
- Messages
- 75
Not sure how long it is workable. I know it takes about 6 hours to fully set, and yes, I use water to smooth itCool!! Do you know how long it stays workable? Can you smooth it with water? (I could with my old epoxy clay)
- Joined
- Dec 6, 2022
- Messages
- 8
This is so cool!! Haven't seen a G3 Custom in a while
- Joined
- Nov 12, 2022
- Messages
- 75
Thank you! I really like the look of the G3s so I like customizing themThis is so cool!! Haven't seen a G3 Custom in a while

