- Joined
- Sep 12, 2022
- Messages
- 1,110
Hi all! I'm back with another of my in-depth tutorials about a process so fussy I'm sure most people would rather start with new hair when rooting a pony. New hair is beautiful and shiny and comes in many colors! But I'm one of those who also likes to trade time and energy to save materials, and honor the work that's already been done to produce them!
This Toot is about how I harvest a pony's mane to be used later for restoration or a custom. It can even be used to deep-clean mildewed plugs. I've mentioned the technique before, but now I've taken some photos to help if you want to try it!
Usual disclaimers: Practice a bit, get an understanding of how the chain-stitch aka lock-loop braid is formed inside the head. Your Mileage May Vary. Offer Void in North Dakota (j/k). And, weirdly, don't garrote your fingers yanking on stubborn pony hair. You can actually slice yourself a bit.
Please note: Usually we will gain only a few millimeters of mane length from this method, so when you're ready to use the mane, you'll likely need to use a lossless rerooting method such as Anchor Thread, or attempt to recreate the lock-loop braid.
Tools: a t-pin or hair parting device of choice; a round and sturdy dowel-shaped object; resealable sandwich baggie for storage. Helpful: tweezers, magnifying lens stand; good lighting for reduced eyestrain. Optional: needle and white thread; some clean white cardstock; a sewing machine with a heavyweight fabric needle in it you won't use again for fabric; a sharp pencil.
Step 1: Get that head off!
In the best circumstances of tidy lock-loop braid and minimal glue, harvesting can be done without removing the head, but it's going to be a lot easier if you can see what's going on in there.
Step 2: Clean that head!
Things just come out better when you start with a clean pony head with groomed hair! Plus, warm to hot water can help loosen the fiber glue inside the head. If you'll be doing step 3, let it all dry first. If not, the plugs hold together nicely when damp. Note: If the glue is gritty and crunchy, we can work with that. If the glue has turned oily or gooey (rare but I've seen it), you may need more assistance than I'm giving here.
Step 3: Totally Optional storage card prep - (creates more work now but saves some work later when rerooting with an anchor thread.)
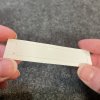
If you're comfortable with a sewing machine and want to experience truly silly, detail-obsessive levels of preparation for future use of the hair fiber, cut a long rectangle of cardstock and use a sewing machine threaded with white thread and a denim needle to create a storage card for the mane. Set the tension a bit looser than default, stitch length a touch longer than default. Backstitch up one short side of the rectangle, then stitch all the way around not too close to the edge, and backstitch again over the same short side. When you get there, raise the needle and lower it into the same holes you already made so you don't perforate the card too much. The goal is just to have two parallel rows of stitching maybe a centimeter or less apart. You can cut the card bigger than needed and trim it down if it helps you sew. Each plug from each row of the mane will sit in one pair of stitches, so you'll want at least as many stitches in one of the two parallel rows as there are total plugs in the mane. This photo shows a short card, but I made a couple of them. And they're reusable!
Step 4: Plug removal!
Check how the glue looks inside the head. Nice clean braid? Minimal glue? Lucky you! Looks like a bird's nest in there? Stay determined. Always start from the neck and work up. Use a pin or other fine tipped tool to separate one of the two bottom plugs so you have all of its fibers in one bundle. Keep hairs from any other plugs out of the way.
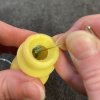
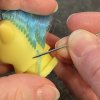
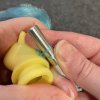
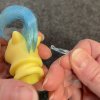
Wrap the whole plug around a dowel or tool handle, hold it, and pull. If it doesn't pop out, try the first plug of the other row. Often one row or the other will come out easier because it was sewn last and none of its fibers are caught in the other row.
Each plug releases the next one. If it's starting to go really smoothly, you can start separating and yanking the bottommost plug from each row at the same time.
Troubleshooting:
My experience is that the plugs come out easier and cleaner as you advance up the neck.
Step 5: Store that crop! - (should last us through to next winter, God willing and the creek don't rise)
If all went well, you should have a beautiful crop of plugs with loops all intact.
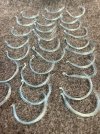
There may be some glue crust on them, maybe some mildew? You can clean this off when the loops are around a needle, either now before carding, or later before installing them in a new mane. If you'll be skipping the storage card idea, best to handle them very little for now, and place them right in a storage baggie (when completely dry, of course), press all the air out, and seal it so they don't shuffle around a lot.
If you made storage cards, here is a fun/tedious process to do while listening to long-form media. Grab some thread that's 4-5 inches longer than your card. Thread your needle, and tie the loose end to the stitching at the corner of the card. Pass the needle under both of the first parallel stitches. This may be easier underneath where the paper holes push up the thread a tad. Be sure you haven't pierced the thread of the stitches.
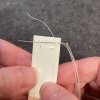
Next, collect all the loops of one plug onto your needle while holding the plug securely in one hand. Use thumb and forefinger to gently pull on the collected loops to slightly free any loose ones and catch those up with the needle.
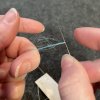
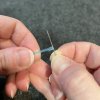
Keep holding that loop, and pass the needle back under the same two stitches, and pull to draw the plug through. You can pass the loops just a tiny bit under the second stitch (more secure) or leave them just touching it, so long as the thread on your needle forms a straight, taut line through all the plugs.
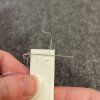
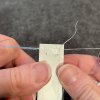
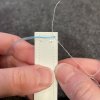
Then pass the needle through the adjacent pair of stitches,
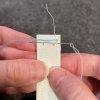
collect another loop bundle,
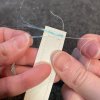
and pass the needle back the way it came to draw the second bundle through. Repeat this process until all plugs are neatly captured on the card.
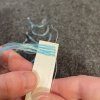
As you sew, keep an eye on the previous plugs and be sure you're not smudging them out of place while grasping the card (damp hands mean danger here), but do try to keep their tails out of the way as you capture the next plug.
Add the short bangs at the end of the card, and weave your thread tail through enough card stitches that it could be pulled loose but won't just fall out, leaving a bit hanging free so you can find it later.
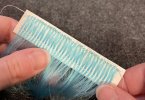
Give the card a little pencil notation of the donor and date, fold the card neatly to fit in a storage baggie (don't bend the hair, just the card), and you're done! You've now spent hours that probably could have been spent elsewhere, but look at all that pony hair you didn't throw away! And when you're ready to install it, it's so easy to free the thread and catch each plug on a needle for sewing into a new mane.
Let me know if you have any questions!
This Toot is about how I harvest a pony's mane to be used later for restoration or a custom. It can even be used to deep-clean mildewed plugs. I've mentioned the technique before, but now I've taken some photos to help if you want to try it!
Usual disclaimers: Practice a bit, get an understanding of how the chain-stitch aka lock-loop braid is formed inside the head. Your Mileage May Vary. Offer Void in North Dakota (j/k). And, weirdly, don't garrote your fingers yanking on stubborn pony hair. You can actually slice yourself a bit.
Please note: Usually we will gain only a few millimeters of mane length from this method, so when you're ready to use the mane, you'll likely need to use a lossless rerooting method such as Anchor Thread, or attempt to recreate the lock-loop braid.
Tools: a t-pin or hair parting device of choice; a round and sturdy dowel-shaped object; resealable sandwich baggie for storage. Helpful: tweezers, magnifying lens stand; good lighting for reduced eyestrain. Optional: needle and white thread; some clean white cardstock; a sewing machine with a heavyweight fabric needle in it you won't use again for fabric; a sharp pencil.
Step 1: Get that head off!
In the best circumstances of tidy lock-loop braid and minimal glue, harvesting can be done without removing the head, but it's going to be a lot easier if you can see what's going on in there.
Step 2: Clean that head!
Things just come out better when you start with a clean pony head with groomed hair! Plus, warm to hot water can help loosen the fiber glue inside the head. If you'll be doing step 3, let it all dry first. If not, the plugs hold together nicely when damp. Note: If the glue is gritty and crunchy, we can work with that. If the glue has turned oily or gooey (rare but I've seen it), you may need more assistance than I'm giving here.
Step 3: Totally Optional storage card prep - (creates more work now but saves some work later when rerooting with an anchor thread.)
If you're comfortable with a sewing machine and want to experience truly silly, detail-obsessive levels of preparation for future use of the hair fiber, cut a long rectangle of cardstock and use a sewing machine threaded with white thread and a denim needle to create a storage card for the mane. Set the tension a bit looser than default, stitch length a touch longer than default. Backstitch up one short side of the rectangle, then stitch all the way around not too close to the edge, and backstitch again over the same short side. When you get there, raise the needle and lower it into the same holes you already made so you don't perforate the card too much. The goal is just to have two parallel rows of stitching maybe a centimeter or less apart. You can cut the card bigger than needed and trim it down if it helps you sew. Each plug from each row of the mane will sit in one pair of stitches, so you'll want at least as many stitches in one of the two parallel rows as there are total plugs in the mane. This photo shows a short card, but I made a couple of them. And they're reusable!

Step 4: Plug removal!
Check how the glue looks inside the head. Nice clean braid? Minimal glue? Lucky you! Looks like a bird's nest in there? Stay determined. Always start from the neck and work up. Use a pin or other fine tipped tool to separate one of the two bottom plugs so you have all of its fibers in one bundle. Keep hairs from any other plugs out of the way.


Wrap the whole plug around a dowel or tool handle, hold it, and pull. If it doesn't pop out, try the first plug of the other row. Often one row or the other will come out easier because it was sewn last and none of its fibers are caught in the other row.
Each plug releases the next one. If it's starting to go really smoothly, you can start separating and yanking the bottommost plug from each row at the same time.
Troubleshooting:
No plugs will come out? Glue may be too intact. Sometimes you can take a blunt object and gently crush the glue wad some more. In a G1 pony this glue has often become brittle and turns to grit. Sweep and tap this stuff into the trash, don't need to be eatin' any of that. Also try probing through the neck with your t-pin and see if you can hook behind the first plugs and pull them forward or down. Try to encourage the loops wrapped around from behind to slide off. Might have to get brutal with the first couple plugs and pull them out a hair at a time and discard.
Loops are intact but all over the place? If patience allows, dutifully catch each loop up on your needle later to tidy up the bundle.
Plugs come out all snapped with no intact loops? Sometimes this happens for the first plugs, but if it's happening more than 2 or 3 plugs up you may be pulling too hard against interference. Discard this hair or save it for short bangs if it's long enough.
Some loops stick up out of the plug hole from inside? Let them be. They'll come out with the next plug. However, if there are little broken strands sticking out, tweezer and pull these to reduce junk that loops may get caught on.
My experience is that the plugs come out easier and cleaner as you advance up the neck.
Step 5: Store that crop! - (should last us through to next winter, God willing and the creek don't rise)
If all went well, you should have a beautiful crop of plugs with loops all intact.

There may be some glue crust on them, maybe some mildew? You can clean this off when the loops are around a needle, either now before carding, or later before installing them in a new mane. If you'll be skipping the storage card idea, best to handle them very little for now, and place them right in a storage baggie (when completely dry, of course), press all the air out, and seal it so they don't shuffle around a lot.
If you made storage cards, here is a fun/tedious process to do while listening to long-form media. Grab some thread that's 4-5 inches longer than your card. Thread your needle, and tie the loose end to the stitching at the corner of the card. Pass the needle under both of the first parallel stitches. This may be easier underneath where the paper holes push up the thread a tad. Be sure you haven't pierced the thread of the stitches.

Next, collect all the loops of one plug onto your needle while holding the plug securely in one hand. Use thumb and forefinger to gently pull on the collected loops to slightly free any loose ones and catch those up with the needle.


Keep holding that loop, and pass the needle back under the same two stitches, and pull to draw the plug through. You can pass the loops just a tiny bit under the second stitch (more secure) or leave them just touching it, so long as the thread on your needle forms a straight, taut line through all the plugs.


Then pass the needle through the adjacent pair of stitches,

collect another loop bundle,

and pass the needle back the way it came to draw the second bundle through. Repeat this process until all plugs are neatly captured on the card.

As you sew, keep an eye on the previous plugs and be sure you're not smudging them out of place while grasping the card (damp hands mean danger here), but do try to keep their tails out of the way as you capture the next plug.
Add the short bangs at the end of the card, and weave your thread tail through enough card stitches that it could be pulled loose but won't just fall out, leaving a bit hanging free so you can find it later.

Give the card a little pencil notation of the donor and date, fold the card neatly to fit in a storage baggie (don't bend the hair, just the card), and you're done! You've now spent hours that probably could have been spent elsewhere, but look at all that pony hair you didn't throw away! And when you're ready to install it, it's so easy to free the thread and catch each plug on a needle for sewing into a new mane.
Let me know if you have any questions!
Last edited:


